Start your first instance
After following this document you will
- Have a trial instance running on your local computer
- Connect to the test instance and send files to your backend bucket
Requirements
For this tutorial to work you need to:
- have an account created in a region on DocEvent.io.
- be running Linux, Mac or Windows.
- have a configured service in DocEvent to connect to your Azure, GCS or S3 bucket - Learn how to create a service and connect to Azure
Generate a trial license
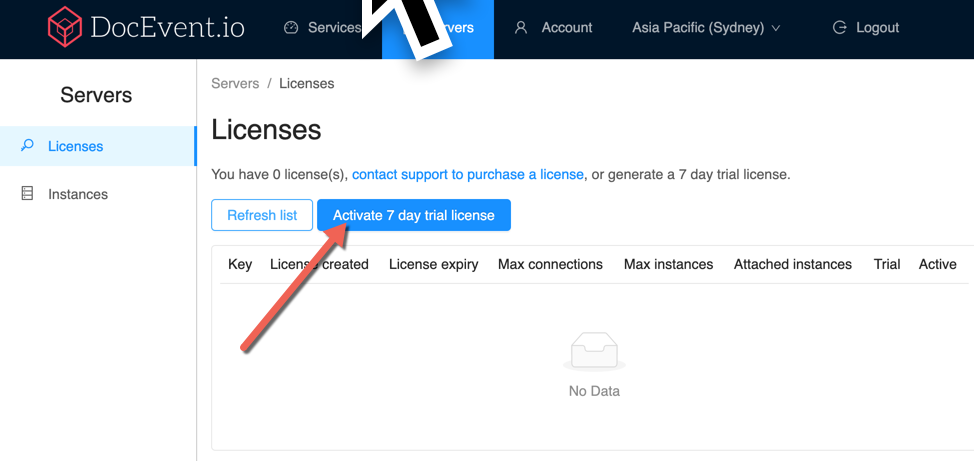
From the Servers tab in the portal, click on the Activate trial license button.

A new license key will be generated, and is listed in the table

Download the server binary to your computer
From the Servers page in the portal, a list of current binaries and the latest version will appear, click on the version relevant to your system.
| sfs-server-darwin-amd64-* | Mac OS 64bit |
| sfs-server-linux-amd64-* | Linux 64bit |
| sfs-server-linux-arm-* | Linux ARM |
| sfs-server-windows-amd64-* | Windows 64bit |
- For Window you must rename the binary to append a .exe extension to make the file executable.
- For Linux/Mac the file needs to be chmod a+x to make it executable
Start up the server
To start the server on linux, provide the -license and -region option for the region where your configuration is stored, in this case it is ap-southeast-2. Regardless of platform Windows/Mac/Linux the options are identical.
./sfs-server-linux-amd64-0.1.7+165230a -license m1HKmWoBK2F8vTIMl7vU -region ap-southeast-2
The server will startup with these default options
| Description | Default | How to change |
| FTP Port | 2021 | -port21 |
| Implicit FTP Port | 9990 | -port990 |
| SSH Port | 2022 | -port22 |
Server output
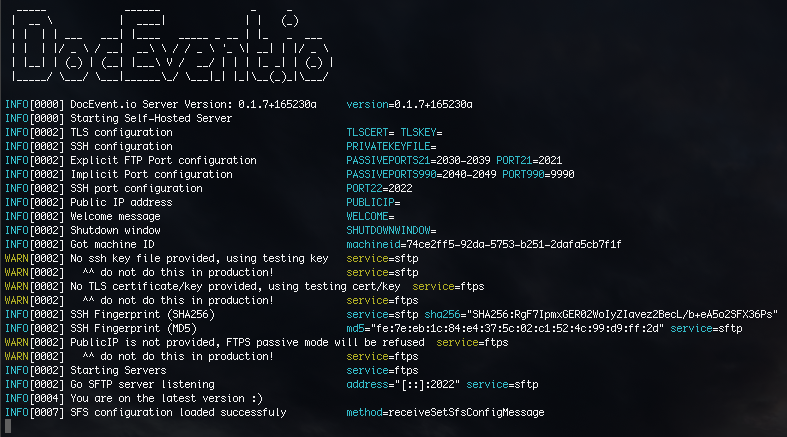
Once the server is running you will see a start screen with some outputs regarding connectivity, port numbers and a splash screen:

It will only take a few seconds to load and once the SFS configuration loaded successfully message appears the configuration is loaded from the cloud and the server is ready to accept connections.
Testing the server
First, be sure to have a SFS service configuration setup in the DocEvent.io cloud that connects to an existing S3 / Azure or GCS bucket.
You can then connect to the server using the testing port numbers. For example:

The above command will connect to localhost on port 2022 via sftp.
Logging of connections
Connection logging goes directly to stdout, there are no log files that are written by the server.
In production all log data can be output in JSON format and pushed to a file or logging service where it can be parsed and filtered.
Whenever a new connection or transfer happens it is logged like so:
INFO[0224] bytes=0 operation=login path_prefix= protocol=sftp session_id=fbc7a4e31e7152d0a05d source_ip=127.0.0.1 src_location= src_path= src_version_id="<nil>" transaction=true type=login user.home=/ user.sub=aeb2760c-fd9e-4e69-a5df-092eb7d40096 user.username=root user.uuid=5htvwc6l
The fields for logging are provided above, these are the equivalent to the JSON fields that are output. For more information on logging in production, see the deploy to production article.
Managing the server
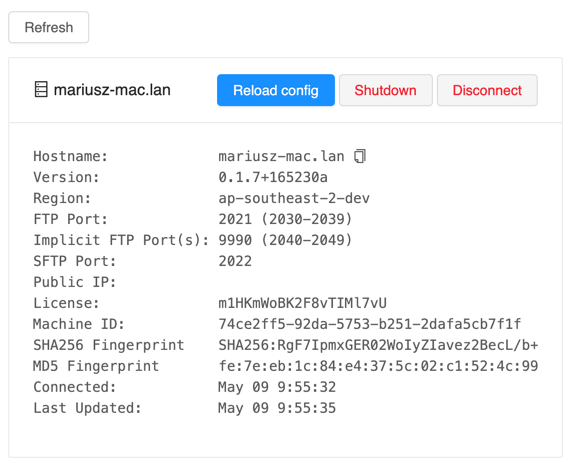
Now that the server is running, you can view all your instances via the Instances page on the Servers tab on your portal.

The instances page will show all the instances currently running and connected to the service.
Instances will remain connected for the entire time that they run, they will reconnect in case of network failure and can continue to serve while disconnected.
Making configuration changes
You can add users to your services, add new services, or update alias information via the DocEvent portal, after doing so the server will automatically reload the configuration with a SFS configuration loaded successfully message on the console.
Manually pushing configuration changes
If there is a network failure during configuration changes the server may not receive the update. If this should happen a Reload config button is available in the console, and it will push updated configuration directly to the instance immediately.
You can also use a kill -1 SIGHUP signal on the process ID in order to tell the instance to reload it's data.

The server will then reload the configuration

Shutdown the server
The instance can also be shutdown using the Shutdown button, at which point the server will attempt to cleanly shutdown and stop the process.
Disconnect the server from the UI
An option exists to disconnect the instance from the UI, this will keep the server running, accept connections but it will no longer be managed by DocEvent.io.
That's it!
You're running your own instance locally. Now it is time to look at more options available to the server and getting it running production mode.
.png)